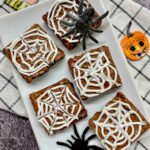
Spider Web Brownies are an easy and creepy Halloween treat! They are easy to make and perfect for school treats, Halloween parties and movie nights.

Spider Web Brownies Recipe
Don't be scared of these spider web brownies... they may be creepy to look at but they are so easy to make! They are a fan favorite at Halloween parties and for school treats.
What are Spider Web Brownies?
Spider web brownies are so simple to make with only 5 ingredients. To keep the recipe quick and easy, I use store bought brownie mix and vanilla frosting.
Decorating the brownies to create the spider webs is so easy. A piping bag, or a Ziploc bag with the corner cut off, is filled with vanilla icing and a spiral is piped on the brownies. Then a toothpick is used to drag the icing to create the spider webs.
More Halloween Treats Recipes
What is in Spider Web Brownies?

- Brownie Mix & Ingredients for Cooking- use your favorite store bought brownie mix and follow the package directions for the additional ingredients required (ex. oil, water and egg).
- Vanilla Icing - for a quick, low prep recipe I like using store bought icing. You can use homemade, just be sure to use a thick homemade frosting.

How to Make Spider Web Brownies
Full Printable Recipe at Bottom of Page

1 Prepare store bought brownie mix according to package directions in an 8”x8” or 9”x9” square baking dish. Allow the brownies to cool and then remove from the baking tray.
2 Slice the brownies into 16 square pieces.

3 Transfer the vanilla icing into a piping bag with a plain small round tip, or a Ziploc bag with the corner cut off (make a very small cut).
4 Starting from the center of each brownie pipe a spiral around the brownie.
5 From the center of each brownie, use a toothpick to drag the icing to the edges of the brownie.
6 Transfer the brownies to a serving platter and enjoy!

Tips for the Best Spider Web Brownies
- Brownies - for the quickest recipe I like using a store bought brownie mix. You can also use a homemade brownie mix if you prefer. You can get creative and add extra chocolate chips or chocolate chunks into the brownie mix for an extra chocolatey treat.
- Cooling Time - allow the brownies to fully cool in the baking tray. Once the brownies have fully cooled it will be easier to remove them from the baking tray. I like to flip the tray upside down on a cutting board to release the brownies in one piece. Then I cut them into squares. It is also important to allow the brownies to cool before decorating them or else the icing will melt.
- Spider Webs - I find using a toothpick is the easiest way to drag the icing to create the lines in the spider webs. You can also use a knife or fork.

FAQs Spider Web Brownies
Store the decorated brownies in an air tight container at room temperature for up to 3-4 days. Do not stack the brownies when storing.
Yes! These are perfect for make ahead school snacks and Halloween parties. Prepare the brownies and decorate up to 2 days in advance.
Yes! These are freezer friendly. If you have leftover brownies, or you want to make them ahead and freeze them, you can. Please note, when the icing is thawing it may melt slightly and it will look like an extra creepy spider web.

Enjoy!
- Sab
Disclosure: I only recommend products I would use myself and all opinions expressed here are my own. This post may contain affiliate links that at no additional cost to you, may earn me a small commission.

Spider Web Brownies
Ingredients
- 1 box brownie mix (plus ingredients to prepare, or store bought pre-made brownies)
- ½ tub vanilla icing (store bought)
Instructions
- Prepare store bought brownie mix according to package directions in an 8”x8” or 9”x9” square baking dish. Allow the brownies to cool and then remove from the baking tray.
- Slice the brownies into 16 square pieces.
- Transfer the vanilla icing into a piping bag with a plain small round tip, or a Ziploc bag with the corner cut off (make a very small cut).
- Starting from the center of each brownie pipe a spiral around the brownie.
- From the center of each brownie, use a toothpick to drag the icing to the edges of the brownie.
- Transfer the brownies to a serving platter and enjoy!
Nutrition


Leave a Reply