
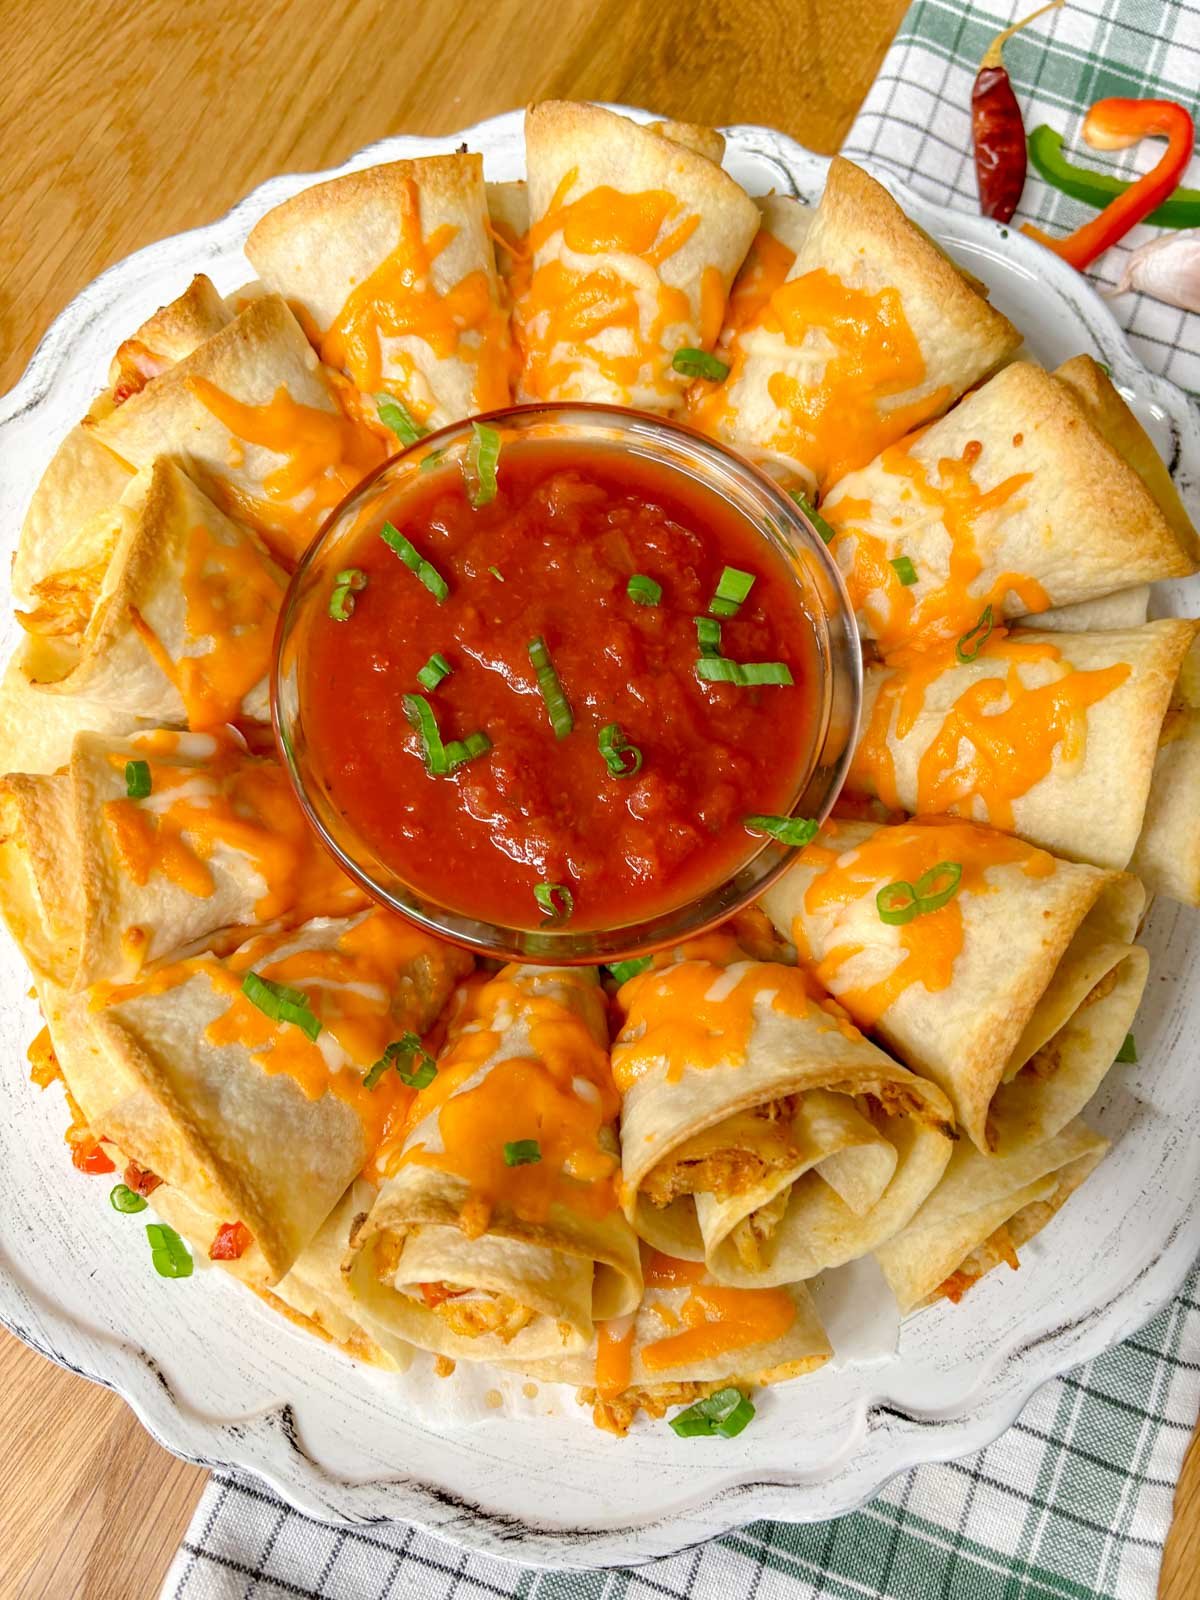
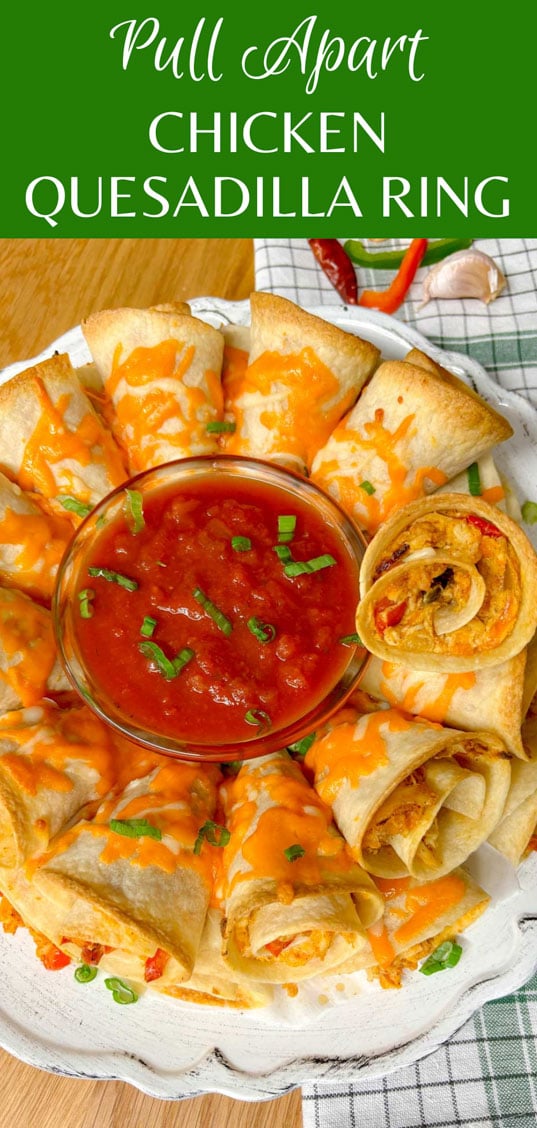
Blooming Chicken Quesadilla Ring is a unique appetizer or dinner you will love! Flour tortillas are rolled with the most irresistible chicken quesadilla filling and shaped into a ring. Topped with cheese and baked until golden brown, it's the ultimate pull apart appetizer or fun Taco Tuesday dinner!
Blooming Chicken Quesadilla Ring Recipe
This post may contain affiliate links. Read my disclosure policy.
The first Blooming Quesadilla Ring we shared was our viral Buffalo Chicken Quesadilla Ring! It went completely viral on social media with over 100 million views! The reason being that it is so simple to make, so flavor packed, and a unique appetizer or main that everyone loves. We knew we had to share a classic chicken quesadilla flavor version of our pull apart quesadilla ring. This is a perfect fun and unique dinner for Taco Tuesday, or an easy game day and holiday appetizer!
What is a Blooming Chicken Quesadilla Ring
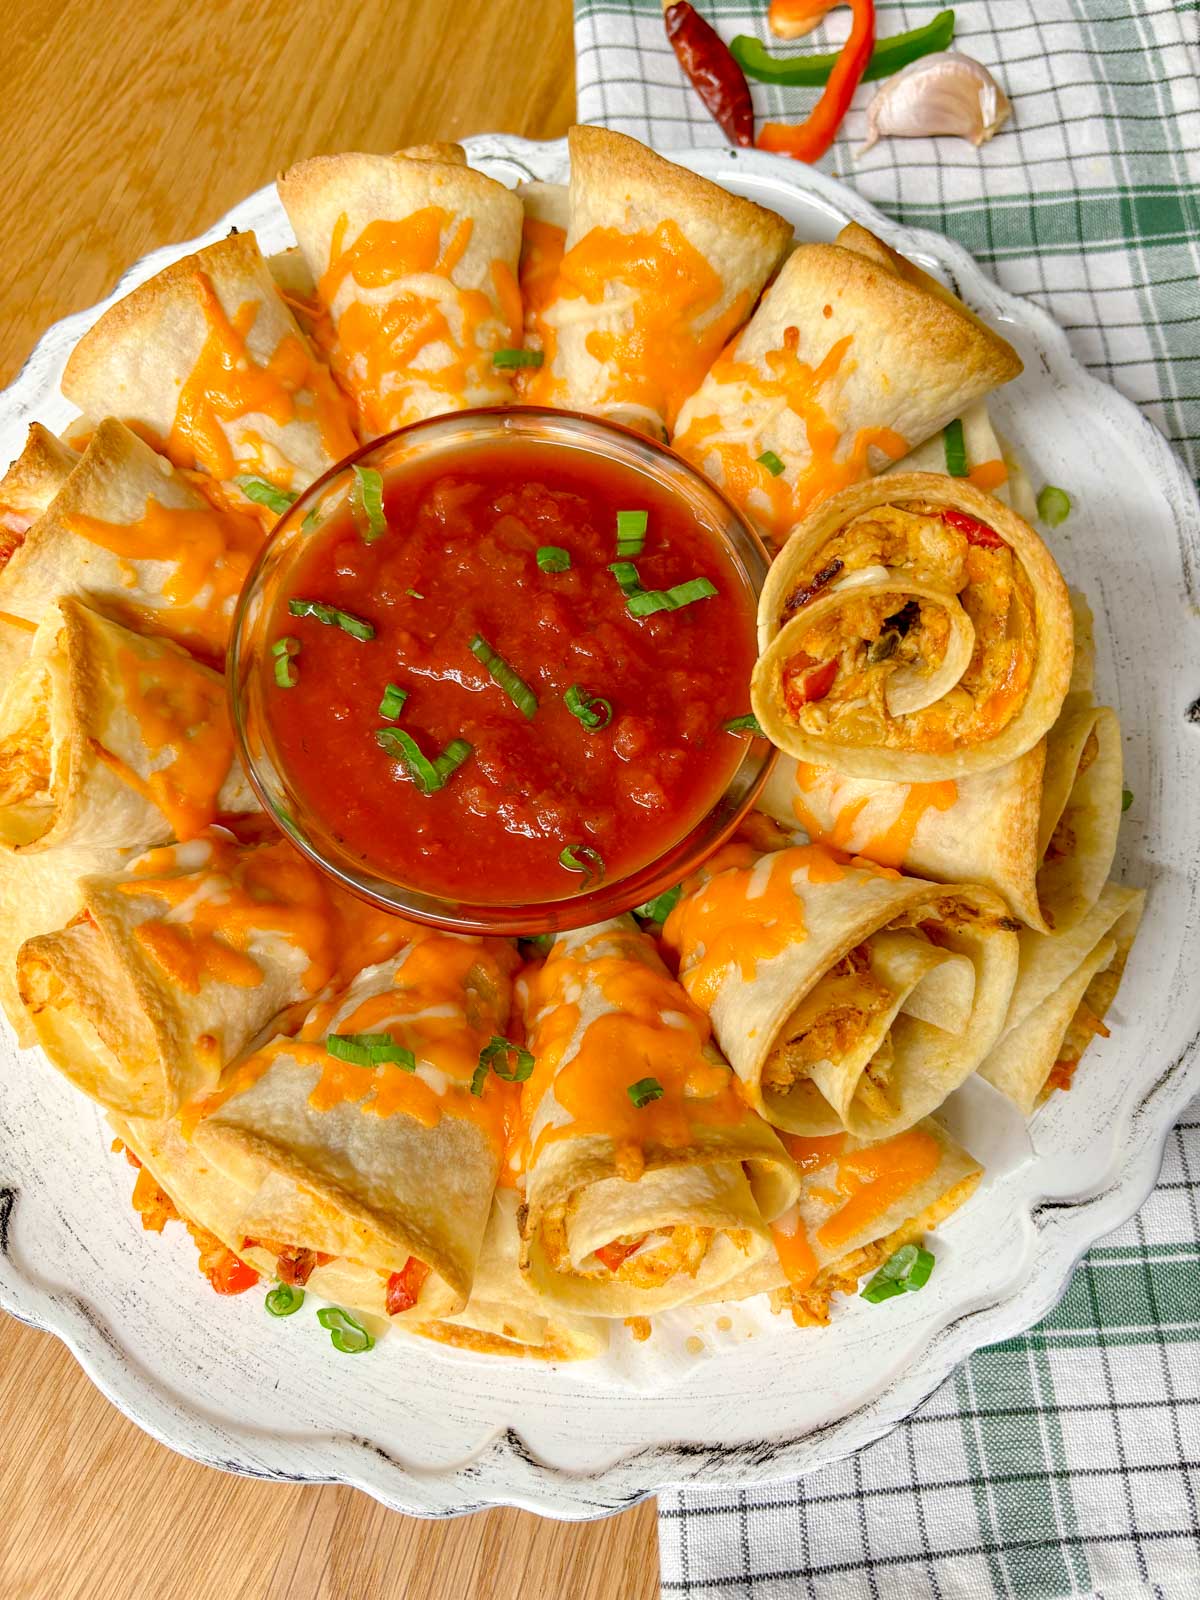
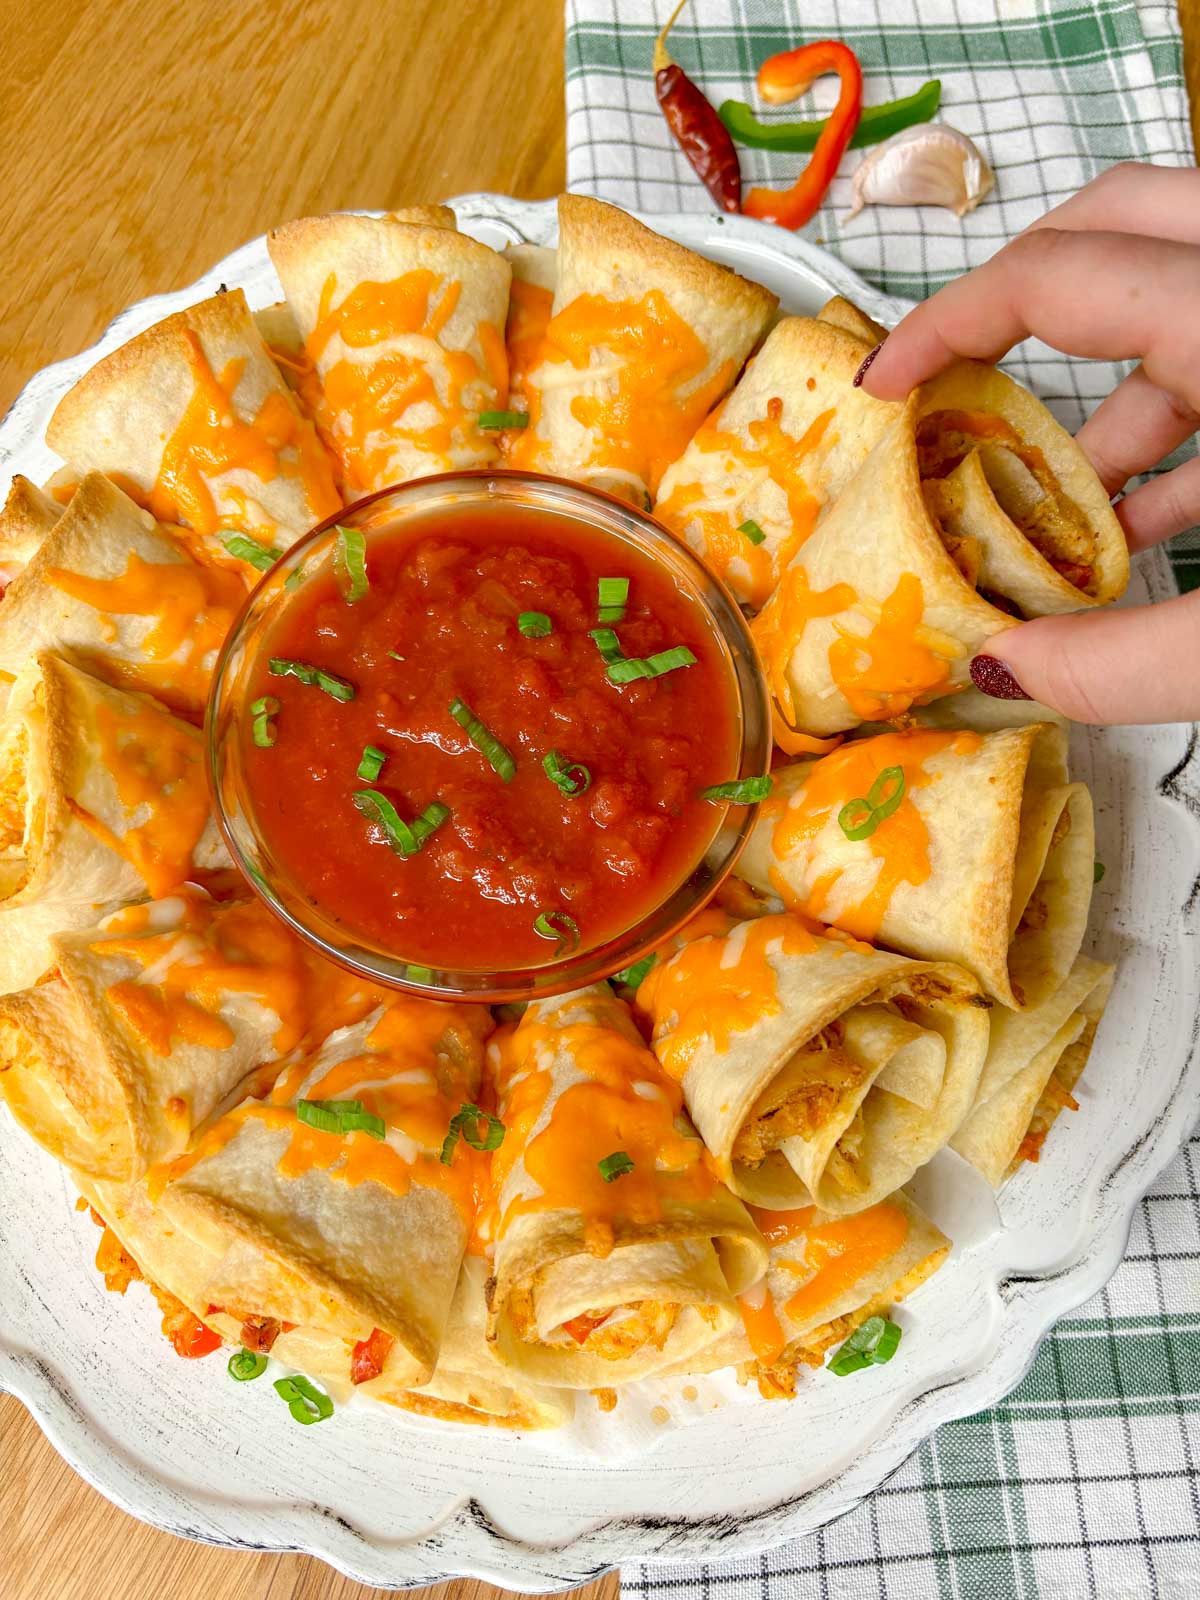
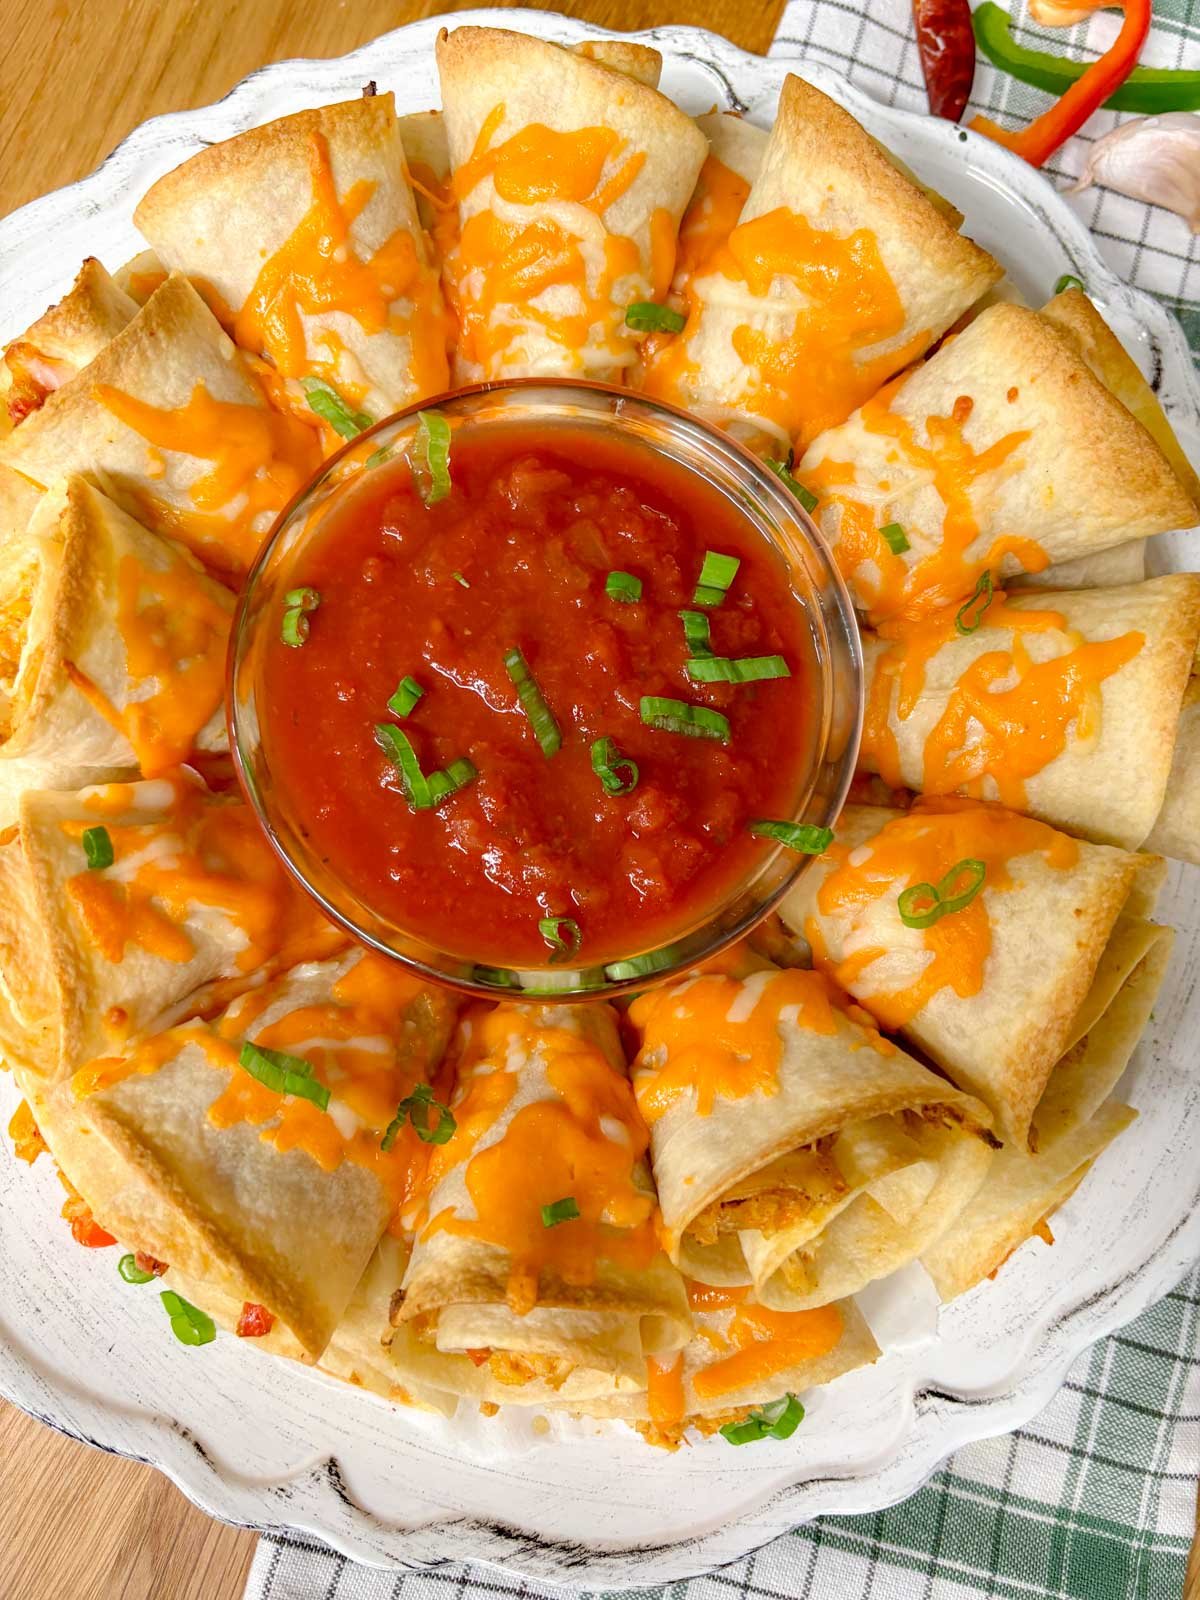
A blooming quesadilla ring is a fun twist on classic quesadillas. Tortillas are sliced in half and filled with an irresistible chicken quesadilla filling that is packed with bell peppers, onions, taco seasoning, and cheese. They are rolled into a cone and arranged in a ring shape with two layers. Baked until golden brown the tortillas are crispy and the filling is oh so creamy! They are a fan favorite appetizer served with salsa, sour cream, and guacamole to dip!
What to Serve with
- Slow Cooker Street Corn Dip
- Chipotle Peach Salsa (Trader Joe's Copycat)
- Mexican Street Corn Dip
- Avocado Shrimp Salsa
- Mexican Street Corn Pasta Salad
Ingredients
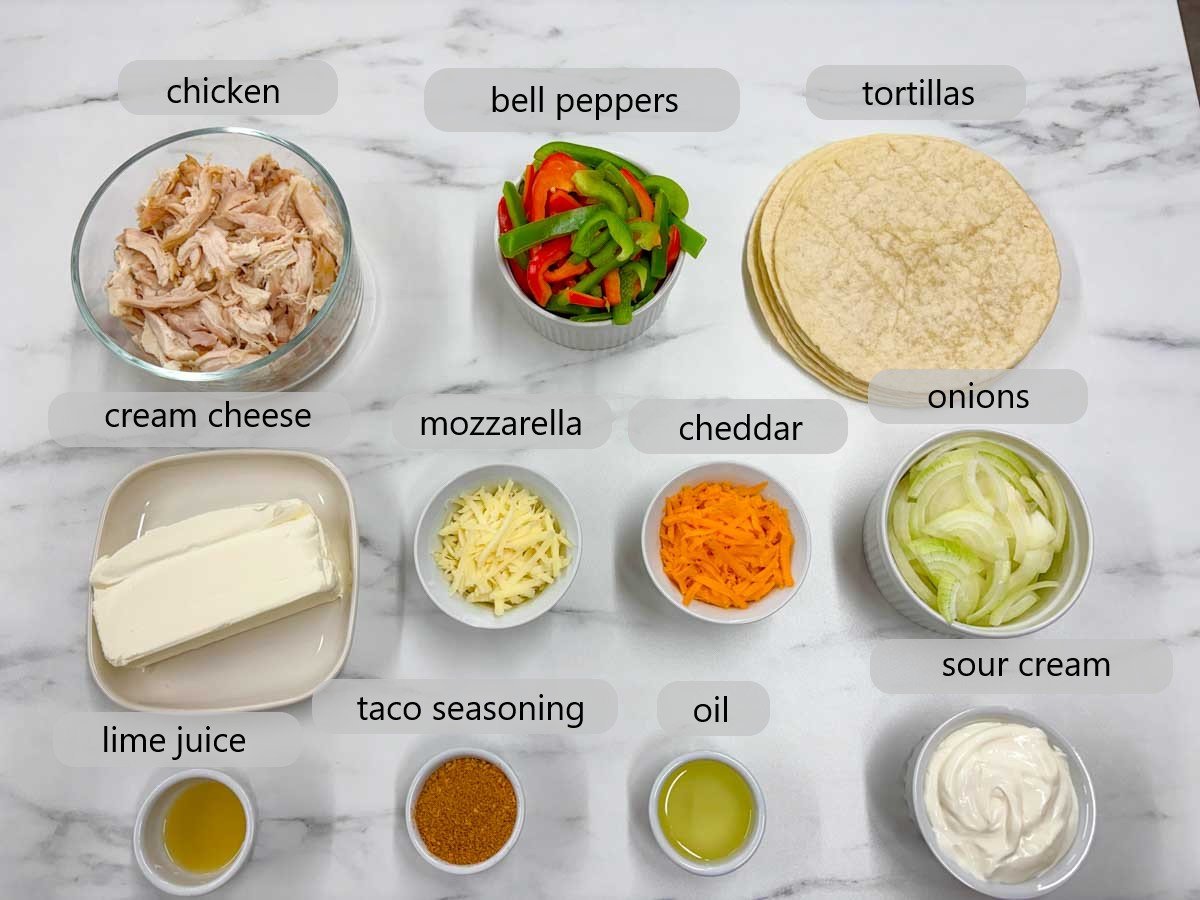
- Cooked Chicken - the best part about this recipe is that it's meant to be a quick and easy appetizer! That means you can use rotisserie chicken. All you need to do is shred the chicken. You can also make homemade chicken and shred it into small pieces.
- Bell Peppers - you can use any combination of bell peppers you like. We love using a mix of red and green for a fun colorful recipe!
- Tortillas - we recommend using flour tortillas so that they are easy to roll and do not tear. You can swap for corn tortillas if you prefer. Be sure to microwave the corn tortillas in small batches while you roll them up so they do not cool down too quickly and tear.
- Cream Cheese - the base of the chicken quesadilla filling. Cream cheese is perfect for spreads because it does not fully melt when cooked. Baked cream cheese has the most rich and creamy texture.
- Mozzarella and Cheddar Cheese - the combination of cheddar and mozzarella gives the quesadillas a great stretchy cheesy flavor!
- Onion - thinly sliced onions are sautéed as part of the filling, they are a classic ingredient in chicken quesadillas!
- Lime Juice - adds a pop of lime flavor to the filling.
- Taco Seasoning - you can use store bought or homemade taco seasoning to season the quesadilla filling.
- Oil - to sauté the bell peppers and onions.
- Sour Cream - gives the quesadilla filing an extra rich and creamy texture. It also adds a pop of tangy sour cream flavor which is a common topping or dip for quesadillas!
How to Make Blooming Chicken Quesadilla Ring
Full Printable Recipe at Bottom of page
- Preheat oven to 375℉. Line a large baking sheet or pizza tray with parchment paper or greased foil.
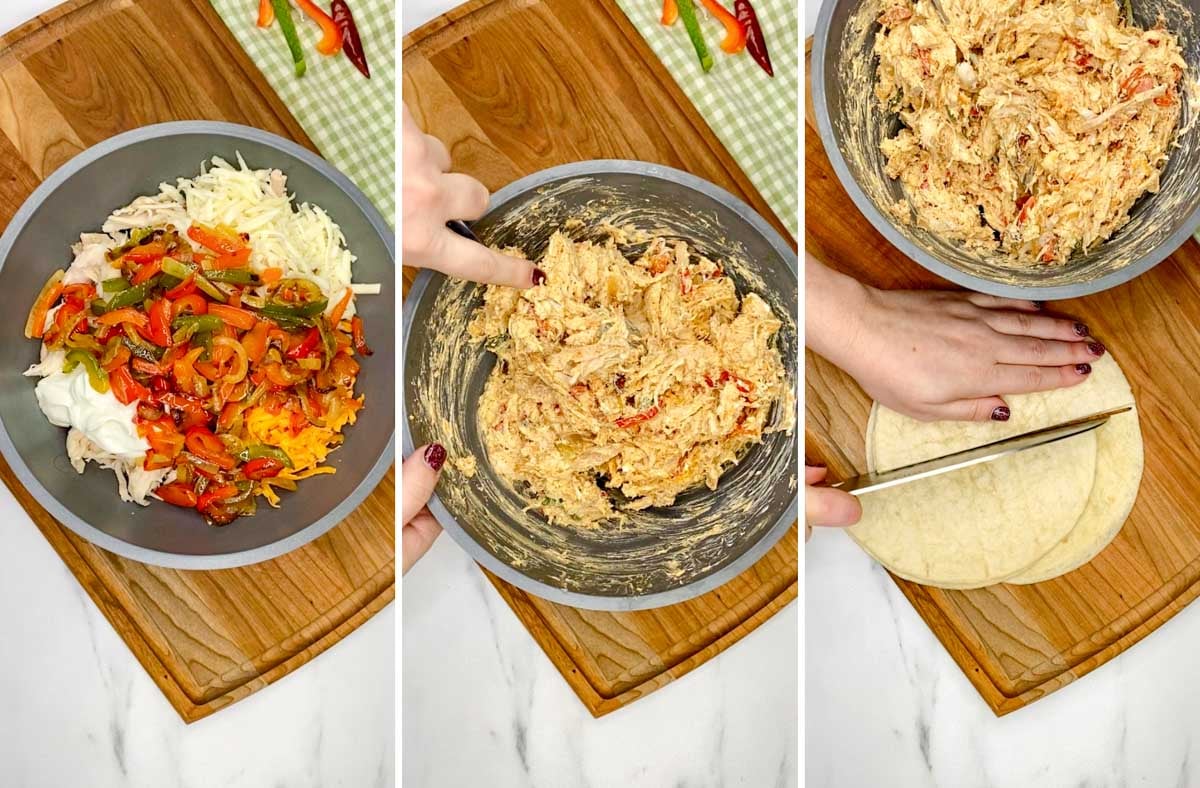
- In a large frying pan or skillet over medium heat add the oil, onions and peppers. Sauté until they have softened and turn golden brown, stirring often, about 5-6 minutes. Set aside to cool while you prepare the remaining ingredients.
- While the veggies cook, prepare the chicken filling. In a large bowl add the cream cheese, sour cream, lime juice, mozzarella cheese, cheddar cheese and taco seasoning. Mix well until evenly combined.
- Then add the shredded chicken and cooled onions and peppers. Gently stir until evenly combined. Set aside.
- Slice the tortillas in half.
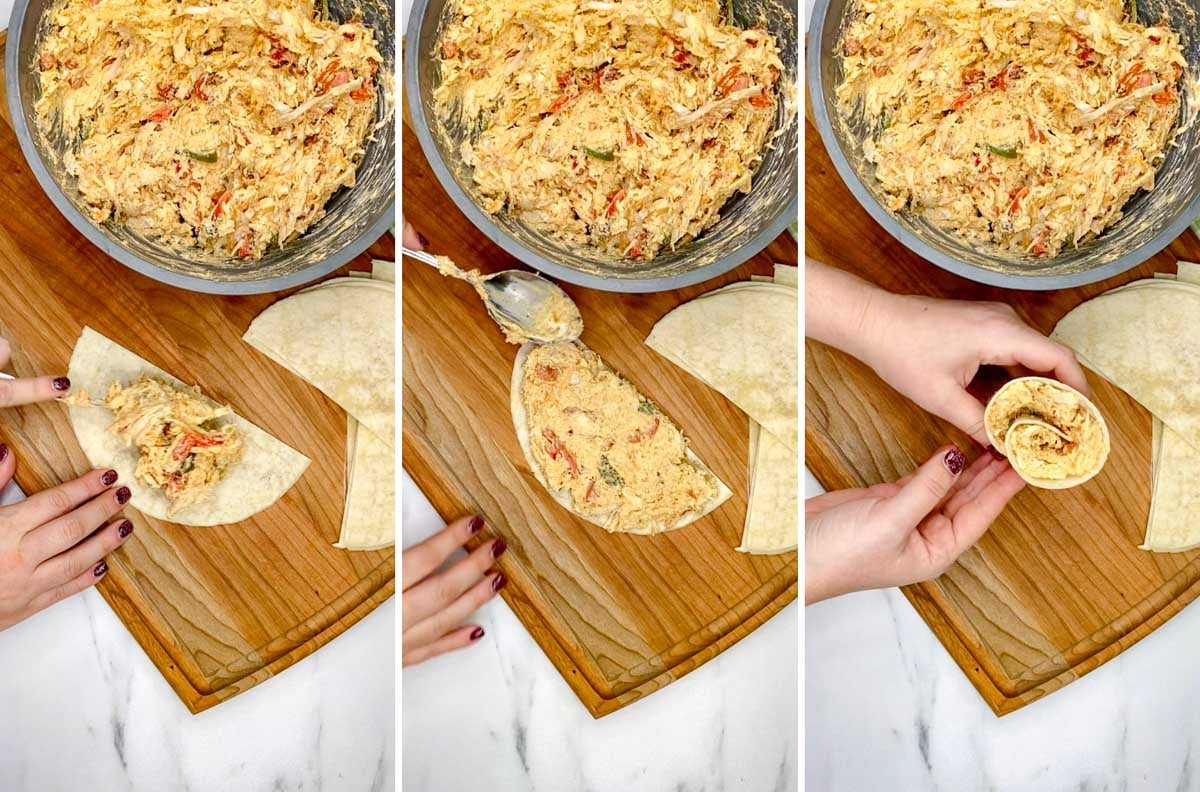
- Evenly divide the chicken filling onto the sliced tortillas (about 1.5 – 2 tablespoons per sliced tortilla). Evenly spread out the filling, leaving a small border around the edges of the tortillas.
- Roll the tortillas into cones. Roll them tightly enough so that the filling holds the cone together but do not press them too tightly so that the filling oozes out.
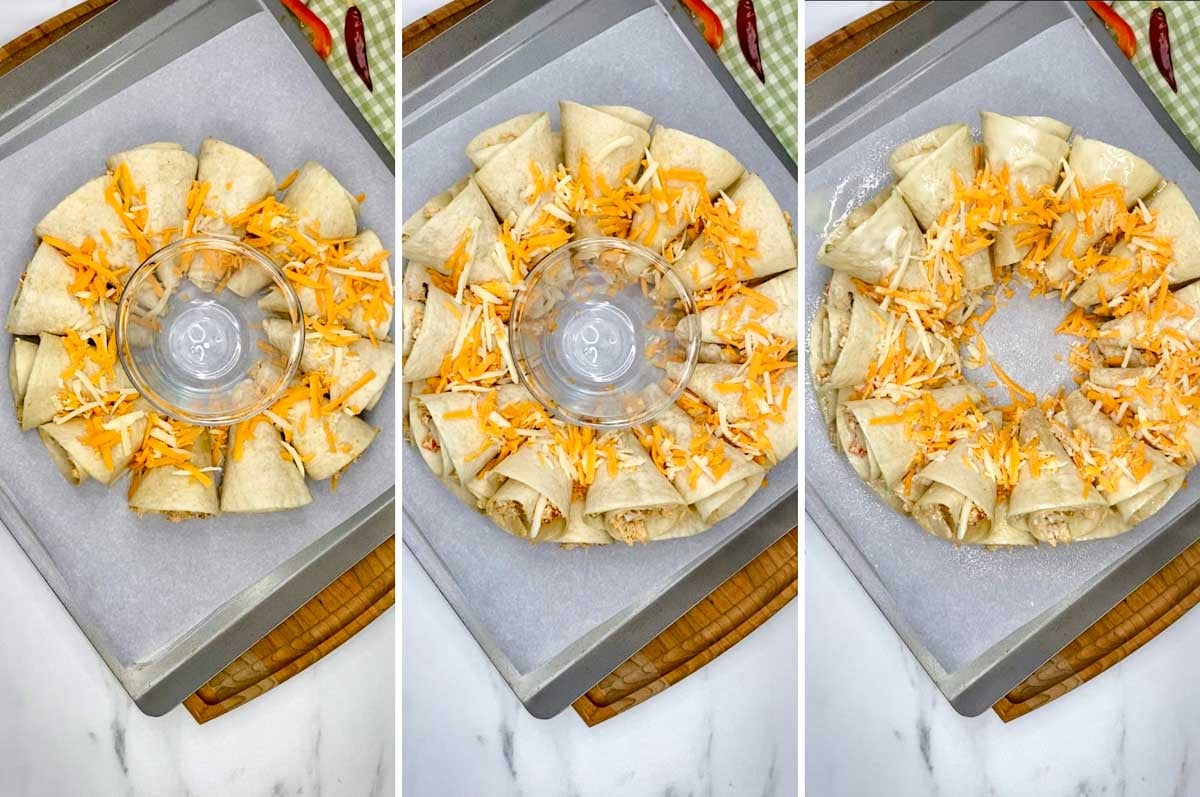
- Place a small round bowl in the center of the baking tray.
- Arrange half of the cones around the bowl with the points of the cones touching the bowl to create the base.
- Sprinkle half of the shredded cheddar and mozzarella cheese on top of the base layer of cones.
- Place the remaining cones on top to create the second layer. Top with the remaining shredded cheddar and mozzarella cheese. Remove the bowl.
- Spray the edges of the tortillas with cooking spray or brush with oil.
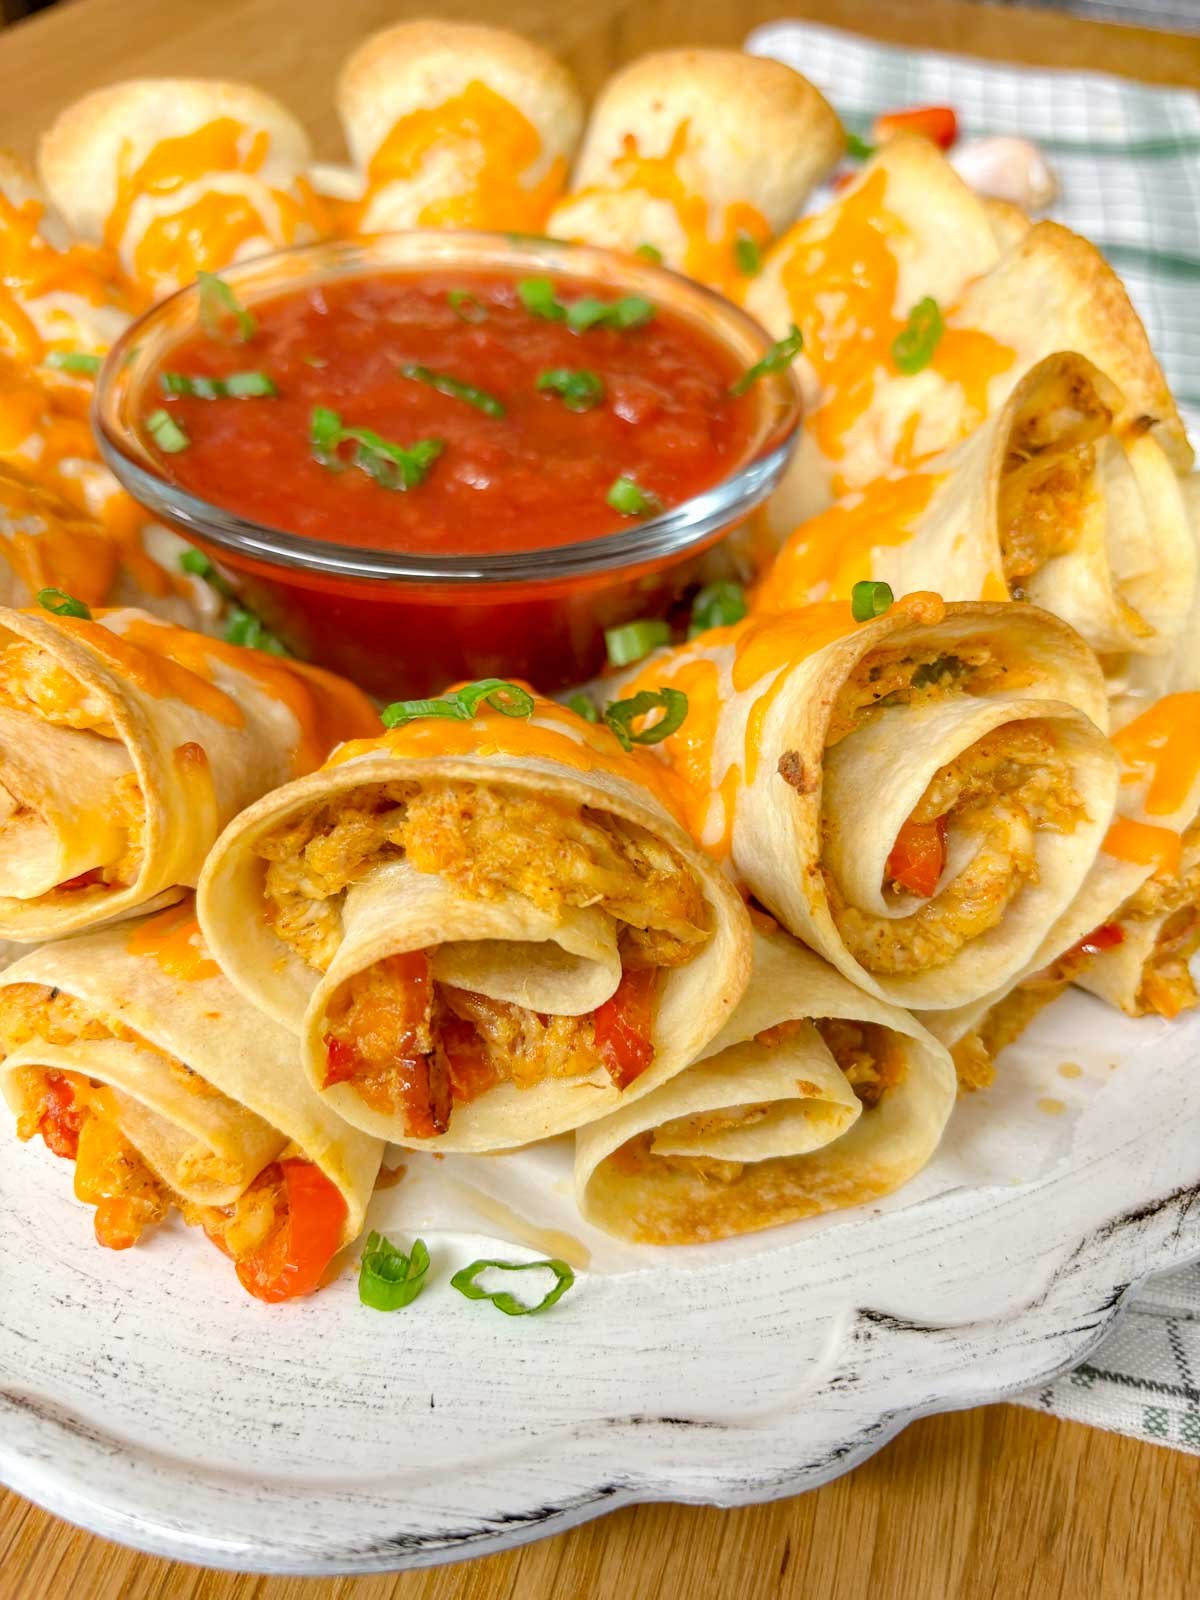
- Bake the quesadilla ring on the middle rack of the oven until the cheese is melted, and the edges of the tortillas are crispy, approximately 15-20 minutes.
- Carefully transfer the blooming quesadilla ring to a serving platter. Optional, garnish with thinly sliced green onions.
- Fill a small bowl with salsa and place in the center of the ring. Serve small bowls of sour cream and guacamole on the side for dipping as well. Enjoy!
Tips for the Best Ring
- Flavor Variations - we love the classic flavor of chicken quesadilla with bell peppers, onions, and taco seasoning. You can get creative and change the flavor profile of the quesadillas to your liking. You can swap the chicken for cooked ground beef or finely diced cooked shrimp! For cheeses try using pepper jack cheese, a shredded Mexican blend cheese, or jalapeno Havarti!
- Tortillas - we recommend using flour tortillas so that they are easy to roll and do not tear. You can swap for corn tortillas if you prefer. Be sure to microwave the corn tortillas in small batches while you roll them up so they do not cool down too quickly and tear. If you would like to make the recipe gluten free, be sure to use gluten free flour tortillas, or naturally gluten free corn tortillas.
- For Serving - you can assemble the quesadilla ring up to 1 day in advance. This can help cut down on prep time the day of serving. Just store the prepared ring covered in the fridge on the baking tray. Remove the baking trays from the fridge, spray foil with cooking spray and cover the trays. Bake the quesadilla ring covered at 350°F for 15-18 minutes, and then uncover for about 4-5 minutes to crispen up the cheese. Serve and enjoy!
FAQ
Oven Baked - place the quesadilla ring on a sheet pan and bake at 350°F for 8-10 minutes.
Microwave - place the quesadilla ring on a microwave safe plate and heat for about 1 minute (note: the quesadillas will no longer be crispy with this method). Due to the size of microwaves we recommend heating up individual quesadillas.
Air Fryer - transfer the quesadillas to the air fryer and cook at 350°F for 6-8 minutes. Due to the size of air fryers we recommend heating up individual quesadillas.
Store the cooled quesadillas in an air tight container in the fridge for up to 4 days, or freeze with below steps.
Yes! This is a great make ahead recipe. You can assemble the quesadillas up to 1 day in advance and store on the baking tray covered in the fridge. Just before serving, remove the baking trays from the fridge, spray foil with cooking spray and cover the trays. Bake the quesadillas covered at 350°F for 15-18 minutes, and then uncover for about 4-5 minutes to crispen up the cheese. Serve and enjoy!
Yes! This is a great freezer friendly recipe, perfect for entertaining prep and leftovers. Transfer the cooled quesadillas to a freezer safe container or Ziploc bag. Freeze for up to 3 months. If you need to stack them, place a layer of parchment paper or foil between the layers to prevent sticking. We recommend reheating from frozen. To reheat, bake the quesadillas covered with foil (spray the foil with cooking spray) at 350°F for 15-18 minutes to warm the centers, and then uncover for about 4-5 minutes to crispen up the cheese.
For vegetarian quesadillas use plant based chicken crumbles.
For gluten free quesadillas use corn tortillas or gluten free flour tortillas. Ensure the brand of taco seasoning used is gluten free. If using store bought shredded cheese, ensure it is gluten free as some contain additives.
More Easy Chicken Dinners
- Chicken Parmesan Meatball Subs on a Stick
- Greek Sheet Pan Dinner
- Panda Express Mushroom Chicken
- Sweet and Sour Chicken Stir Fry
- Chicken Tinga Tacos
Enjoy!
- Sab

Blooming Chicken Quesadilla Ring
Ingredients
Chicken Quesadilla Filling
- 2 tablespoons olive oil
- 1 medium onion (thinly sliced)
- 2 bell peppers (sliced, red, yellow, green or orange, or combination)
- 8 ounces cream cheese (at room temperature, 1 brick, 250 grams)
- ¼ cup sour cream (or plain Greek yogurt)
- 1 tablespoon lime juice
- ¼ cup mozzarella cheese (shredded)
- ¼ cup cheddar cheese (shredded)
- 1 ½ tablespoon taco seasoning
- 3 cups cooked chicken (shredded, example rotisserie chicken or homemade)
Quesadilla Ring
- 12 medium flour tortillas (sized 10" - 12")
- ¼ cup cheddar cheese (shredded)
- ¼ cup mozzarella cheese (shredded)
- Cooking Spray
Garnish
- 3 green onions (thinly sliced)
For Serving Serve
- Salsa
- Guacamole
- Sour Cream
Instructions
- Preheat oven to 375℉. Line a large baking sheet or pizza tray with parchment paper or greased foil.
- In a large frying pan or skillet over medium heat add the 2 tablespoons olive oil, sliced 1 medium onion and 2 bell peppers. Sauté until they have softened and turn golden brown, stirring often, about 5-6 minutes. Set aside to cool while you prepare the remaining ingredients.
- While the veggies cook, prepare the chicken filling. In a large bowl add the room temperature 8 ounces cream cheese, ¼ cup sour cream, 1 tablespoon lime juice, shredded ¼ cup mozzarella cheese, shredded ¼ cup cheddar cheese and 1 ½ tablespoon taco seasoning. Mix well until evenly combined.
- Then add the shredded 3 cups cooked chicken and cooled onions and peppers. Gently stir until evenly combined. Set aside.
- Slice the 12 medium flour tortillas in half.
- Evenly divide the chicken filling onto the sliced tortillas (about 1.5 – 2 tablespoons per sliced tortilla). Evenly spread out the filling, leaving a small border around the edges of the tortillas.
- Roll the tortillas into cones. Roll them tightly enough so that the filling holds the cone together but do not press them too tightly so that the filling oozes out.
- Place a small round bowl in the center of the baking tray.
- Arrange half of the cones around the bowl with the points of the cones touching the bowl to create the base.
- Sprinkle half of the ¼ cup cheddar cheese and ¼ cup mozzarella cheese on top of the base layer of cones.
- Place the remaining cones on top to create the second layer. Top with the remaining shredded cheddar and mozzarella cheese. Remove the bowl.
- Spray the edges of the tortillas with cooking spray or brush with oil.
- Bake the quesadilla ring on the middle rack of the oven until the cheese is melted, and the edges of the tortillas are crispy, approximately 15-20 minutes.
- Carefully transfer the blooming quesadilla ring to a serving platter. Optional, garnish with thinly sliced 3 green onions.
- Fill a small bowl with Salsa and place in the center of the ring. Serve small bowls of Sour Cream and Guacamole on the side for dipping as well. Enjoy!
Nutrition
Leave a Reply